logo

Thursday 28 August 2014
Monday 18 August 2014
Manually setup all-in-one OpenStack Icehouse 3 - keystoneGlance (Image Store)
1. package installation
apt-get install -y glance
2. Create database and credentials for Glance
In MySQL command prompt:
CREATE DATABASE glance;
GRANT ALL ON glance.* TO 'glance'@'%'
IDENTIFIED BY 'glance_dbpass';
3. Create glance related keystone entries
keystone user-create --name=glance
--pass=glance_pass --email=glance@example.com
keystone user-role-add --user=glance
--tenant=service --role=admin
keystone service-create --name=glance
--type=image --description="Glance Image Service"
keystone endpoint-create --service=glance
--publicurl=http://192.168.139.111:9292 --internalurl=http://192.168.139.111:9292
--adminurl=http://192.168.139.111:9292
4. Edit /etc/glance/glance-api.conf and edit the following lines
Hash out
# sqlite_db = /var/lib/glance/glance.sqlite
Add
connection = mysql://glance:glance_dbpass@192.168.139.111/glance
[keystone_authtoken]
auth_host = 192.168.139.111
auth_port = 5000
auth_protocol = http
admin_tenant_name = service
admin_user = glance
admin_password = glance_pass
[paste_deploy]
flavor = keystone
Edit /etc/glance/glance-registry.conf and
edit the following lines as below
Hash out
# sqlite_db = /var/lib/glance/glance.sqlite
Add
connection = mysql://glance:glance_dbpass@192.168.139.111/glance
[keystone_authtoken]
auth_host = 192.168.139.111
auth_port = 5000
auth_protocol = http
admin_tenant_name = service
admin_user = glance
admin_password = glance_pass
[paste_deploy]
flavor = keystone
5. Restart Glance services and sync the database
service glance-api restart
service glance-registry restart
glance-manage db_sync
6.Download a pre-bundled image for testing
glance image-create --name Cirros
--is-public true --container-format bare --disk-format qcow2 --location
https://launchpad.net/cirros/trunk/0.3.0 /+download/cirros-0.3.0-x86_64-disk.img
7. testing
glance index
Manually setup all-in-one OpenStack Icehouse 2 - keystone
1. install the keystone package/service
commands: apt-get install -y keystone
2. create database and username/password
in mysql client tool:
mysql> CREATE
DATABASE keystone;
mysql> GRANT ALL
PRIVILEGES ON keystone.* TO 'keystone'@'%' IDENTIFIED BY 'keystone_dbpass';
3. update keystone configuration file
in /etc/keystone/keystone.conf
hash out line
connection =
sqlite:////var/lib/keystone/keystone.db
add line:
connection =
mysql://keystone:keystone_dbpass@192.168.139.111/keystone
4. restart keystone service and sync database
service keystone restart
keystone-manage db_sync
5. export the environment variables
export OS_SERVICE_TOKEN=ADMIN
export
OS_SERVICE_ENDPOINT=http://192.168.139.111:35357/v2.0
6. data preparation(well explain later)
#tenant, user, role and user-role
keystone tenant-create --name=admin
--description="Admin Tenant"
keystone tenant-create --name=service
--description="Service Tenant"
keystone user-create --name=admin
--pass=ADMIN --email=admin@example.com
keystone role-create --name=admin
keystone user-role-add --user=admin
--tenant=admin --role=admin
#service
keystone service-create --name=keystone
--type=identity --description="Keystone Identity Service"
#end point
keystone endpoint-create --service=keystone
--publicurl=http://192.168.139.111:5000/v2.0
--internalurl=http://192.168.139.111:5000/v2.0
--adminurl=http://192.168.139.111:35357/v2.0
7. create confidential file and source it
export OS_USERNAME=admin
export OS_PASSWORD=ADMIN
export OS_TENANT_NAME=admin
export
OS_AUTH_URL=http://192.168.139.111:35357/v2.0
8. testing
keystone token-get
keystone user-list
Wednesday 13 August 2014
Manually setup all-in-one OpenStack Icehouse 1 - preparation
Manually setup all-in-one OpenStack
Icehouse 1 - preparation
DevStack is a cool tool to setup all-in-one
OpenStack environment but it hides most of the details. To better understand how the each component of OpenStack is setup. here I tried to setup
OpenStack Icehouse on the Ubuntu 14.4 manully following this blog
http://fosskb.wordpress.com/2014/04/12/openstack-icehouse-on-ubuntu-12-04-lts-single-machine-setup/.
My IP is 192.168.139.111
Setup/update the environment
for OpenStack Icehouse
Configure the repositories and update the
packages.
Commands:
apt-get install -y
python-software-properties -- this
is to setup python environment
add-apt-repository cloud-archive:icehouse -- this is to setup the icehouse
repository
apt-get install -y ntp vlan bridge-utils -- this is to setup ntp vlan and other network utils
apt-get install -y ntp vlan bridge-utils -- this is to setup ntp vlan and other network utils
apt-get update && apt-get -y
upgrade -- this is to
update the packages and kernel
reboot --
reboot the server
Setup RabbitMQ server, it seems no
configuration for RabbitMQ
Commands:
apt-get install -y rabbitmq-server -- install rabbitmq
server
Setup MySQL server, configure the my.cnf
and restart MySQL
Commands:
apt-get install -y mysql-server
python-mysqldb
edit the /etc/mysql/my.cnf file
add or modify the below configuration
[mysqld]
bind-address = 0.0.0 .0 -- listen
on all IPs
collation-server = utf8_general_ci -- setup collation
init-connect = 'SET NAMES utf8' -- characterset setting
character-set-server = utf8 -- characterset
setting
restart the MySQL
service mysql restart --
restart MySQL
enable the kernel parameters in /etc/sysctl.conf
net.ipv4.ip_forward=1net.ipv4.conf.all.rp_filter=0
net.ipv4.conf.default.rp_filter=0
Tuesday 12 August 2014
Storage in Cloud
File System is a critical part in OS as it contains both OS,
application binaries as well as application data. In traditional OS, it is
usually on a hard disk or SAN attached disk. In cloud, there are more types of
storage available.
Object Storage(examples: OpenStack swift, Amazon S3, Rackspace Cloud Files, Ceph Storage)
Object storage is the technology that store the files in ‘cloud’, usually the client can have access/modify to the file via HTTP interface(RESTful API), Application can build up file-level access based on object storage.Block Storage(examples: nova-volume, Amazon ESB, iSCSI)
Block device is very similar to the SAN storage, it exposed through a low-level computer bus interface which can be accessed over the network. The OS can create partitions and format the partitions to make the file system. the block Storage can usually only be attached to just one virtual server.File Storage(examples: NFS, CIFS, ClusterFS)
File Storage is quite similar to NAS, client access data through OS’s file system level. Users access it by mouting a remote file system. usually the client need to install some software to remote access it.Setup All-in-One OpenStack environment by using devstack
As OpenStack is a complicated software
suit, it is not very easy to deploy OpenStack for beginners. Devstack is a very
handy tool to deploy all-in-one openstack environment
1.
the box is installed with the
ubuntu 14.4, the user is called stack
2.
update the system and packages
command: #sudo apt-get dist-upgrade
then reboot the machine
3.
make the /opt/stack world wide
readable
commands:
#sudo chown -R stack:strack /opt/stack
#sudo chmod 777 /opt/stack
4.
install git
#sudo apt-getinstall git
5.
download openstack and checkout
the Icehouse version
#sudo git clone https://github.com/openstack-dev/devstack.git
#sudo git checkout -b
icehouseorigin/stable/icehouse
6.
upload the localrc
configuration template
it should be in ~/devstack/
7.
deploy openstack
./stack.sh
After it is running for about 1 hour, you
will have a full-in-one OpenStack environment
Sunday 10 August 2014
Create an VM in OpenStack
This is the basic workflow to create a VM in OpenStack
from http://www.slideshare.net/mirantis/openstack-cloud-request-flow

Nova-API
Nova-API
Nova-api accepts and responds to end user compute API calls.
It supports OpenStack Compute API, Amazon's EC2 API and a special Admin API
(for privileged users to perform administrative actions). It also initiates
most of the orchestration activities (such as running an instance) as well as
enforces some policy (mostly quota checks). Internally, it handles requests from the user and relays them
to the cloud controller.
Nova-API Architecture:

Nova-API Architecture:
Saturday 9 August 2014
Keystone authentication
Keystone is the key component for OpenStack Authentication. Every requests via API must be checked and
verified by Keystone. In general , when the clients provide a valid
username/password combination, the OpenStack keystone will provide a token, the
following comminucation will be based on the token. There are two ways of
authentication for keystone due to the way how client provides their
identification: UUID and PKI.
Universally Unique IDentifier (UUID)
1. Client send the username/password to keystone
2. Keystone service verify the username/password pair
3. Keystone generate a token (usually a random string), store it in the backend and then send the copy back to the client
4. Every request from client will attach the token and keystone will verify the token(matched? Expired?)
5. If valid, keystone will return the 200 and process the request, otherwise will be an 401 then reject.
See workflow here:
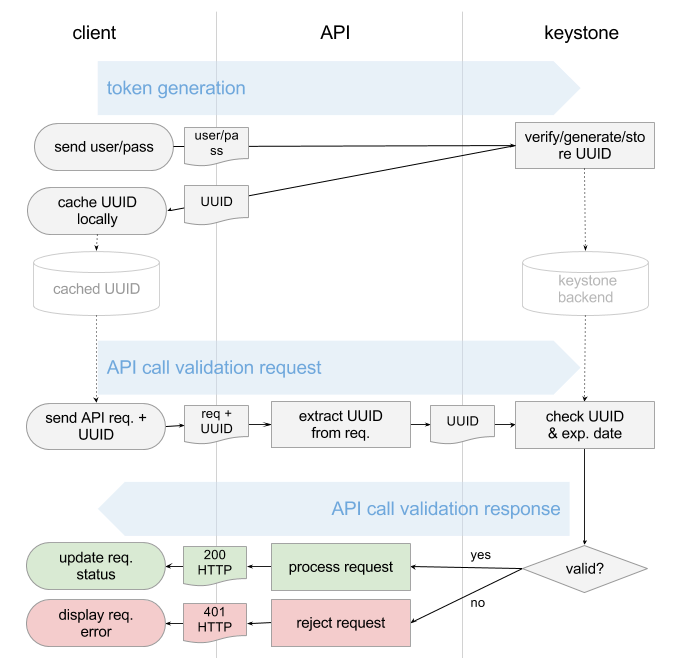
UUID is quite simple to implement but since
every requirement will be via keystone and it could be the bottleneck in the
large scale cloud.
PKI token
PKI token was introduced since Grizzly.
The workflow is similar but the token is based on X509 PKI
while Keystone is the CA.
0. When keystone was installed , we need to generate the keys and certs including CA private key, CA certificates, Signing private key, Signing certificate.
1. When client provides valid username/password pair, Keystone will use Cryptographic Message Syntax (CMS) to produce CMS token out of the following data: Service catalog,User roles,Metadata
2. The token will be cached in keystone and send back to client.
3. When the requests come via API, they will attach the CMS token , the API has got keystone’s copy of Signing certificate, Revocation list, CA certificate so it can check the validity of token offline (without contacting keystone)
4. If valid, keystone will return the 200 and process the request, otherwise will be an 401 then reject.
See workflow there

Further reading blog:
http://www.mirantis.com/blog/understanding-openstack-authentication-keystone-pki/
keystone commands
There are a few important keystone related commands every
OpenStack Operators must know.
Service related:
keystone service-list : list the keystone service
keystone service-get : get the detailed service
information
keystone service-create :
create keystone service
keystone service-delete :
delete the service
endpoint related:
keystone endpoint-list :
list the keystone endpoint
keystone endpoint-get :
get the detailed endpoint information
keystone endpoint-create :
create keystone endpoint
keystone endpoint-delete :
delete the endpoint
Tenant related:
keystone tenant-list :
list the keystone tenant
keystone tenant-get :
get the detailed tenant information
keystone tenant-create :
create keystone tenant
keystone tenant-delete :
delete the tenant
keystone tenant-update :
update the tenant information
user related:
keystone user-list :
list the keystone user
keystone user-get :
get the detailed user information
keystone user-create :
create keystone user
keystone user-delete :
delete the user
keystone user-update :
update the user information
keystone user-password-update : update the user password information
keystone user-role-update
: update the user role information
keystone user-role-add
: add the user role
information
keystone user-role-delete :
delete the user role information
keystone user-role-list :
list the user role information
Role related
keystone role-list :
list the keystone role
keystone role-get :
get the detailed role information
keystone role-create :
create keystone role
keystone role-delete :
delete the role
Friday 8 August 2014
Install docker on ubuntu 12.04
1. Update the kernel to 3.8 above
When 12.04 was installed, the kernel was 3.3, we need to update the kernel to 3.8 above to better support dockersudo apt-get update
sudo apt-get install linux-image-generic-lts-raring linux-headers-generic-lts-raring
sudo reboot
then we can check
stack@openstack:~$ uname -a
Linux openstack 3.13.0-29-generic #53-Ubuntu SMP Wed Jun 4 21:00:20 UTC 2014 x86_64 x86_64 x86_64 GNU/Linux
2. Add docker key to your local key repository
sudo apt-key adv --keyserver keyserver.ubuntu.com --recv-keys 36A1D7869245C8950F966E92D8576A8BA88D21E9you can check as
stack@openstack:~$ sudo apt-key list
/etc/apt/trusted.gpg
--------------------
pub 1024D/437D05B5 2004-09-12
uid Ubuntu Archive Automatic Signing Key <ftpmaster@ubuntu.com>
sub 2048g/79164387 2004-09-12
pub 1024D/FBB75451 2004-12-30
uid Ubuntu CD Image Automatic Signing Key <cdimage@ubuntu.com>
uid Ubuntu CD Image Automatic Signing Key <cdimage@ubuntu.com>
pub 4096R/C0B21F32 2012-05-11
uid Ubuntu Archive Automatic Signing Key (2012) <ftpmaster@ubuntu.com>
uid Ubuntu Archive Automatic Signing Key (2012) <ftpmaster@ubuntu.com>
pub 4096R/EFE21092 2012-05-11
uid Ubuntu CD Image Automatic Signing Key (2012) <cdimage@ubuntu.com>
pub 2048R/A88D21E9 2013-08-16
uid Docker Release Tool (releasedocker) docker@dotcloud.com
check by :
uid Ubuntu CD Image Automatic Signing Key (2012) <cdimage@ubuntu.com>
pub 2048R/A88D21E9 2013-08-16
uid Docker Release Tool (releasedocker) docker@dotcloud.com
3. Add the repository to your APT sources
#sudo sh –c “echo deb https://get.docker.io/ubuntu docker main > /etc/apt/sources.list.d/docker.list”check by :
stack@openstack:~$ cat /etc/apt/sources.list.d/docker.list
deb https://get.docker.io/ubuntu docker main
check by
stack@openstack:~$ ps -ef | grep docker
root 1419 1 2 22:19 ? 00:00:55 /usr/bin/docker -d
check by
stack@openstack:~$ sudo docker ps -l
CONTAINER ID IMAGE COMMAND CREATED STATUS PORTS NAMES
a4c13d74f23a ubuntu:14.04 /bin/echo hello worl 11 minutes ago Exited (0) 11 minutes ago tender_heisenberg
hello world
deb https://get.docker.io/ubuntu docker main
4. Install docker
sudo apt-get update ; sudo apt-get install -y lxc-dockercheck by
stack@openstack:~$ ps -ef | grep docker
root 1419 1 2 22:19 ? 00:00:55 /usr/bin/docker -d
5. Install Ubuntu to your local sandbox
sudo docker pull Ubuntucheck by
stack@openstack:~$ sudo docker ps -l
CONTAINER ID IMAGE COMMAND CREATED STATUS PORTS NAMES
a4c13d74f23a ubuntu:14.04 /bin/echo hello worl 11 minutes ago Exited (0) 11 minutes ago tender_heisenberg
6. Hello world now:
stack@openstack:~$ sudo docker run ubuntu /bin/echo hello worldhello world
now a standard docker is running on your ubuntu 12.4
Tuesday 5 August 2014
Glance Overview
Glance is the image management component in
OpenStack, it is a simple component in OpenStack and now it is very stable. The
purpose of Glance is to store the image template in OpenStack, when we need to
create the Virtual Machine (VM) from OpenStack. When you upload the images in
Glance, it will upload to a specific location and mark the location, attributes
and permissions in database, when we use Nova to create VM, it will check the
location and permission then pull down the image from Glance.

Glance Architecture:
Glance has three parts:
- glance-api: accepts REST-API
requests, and working with other two components to fulfill image lookup,
upload, delete. By default, it is listening on 9292
- glance-registry: interact with database
to handle the metadata, there are two database tables: image(general image information
such as format, image size) and image property (customized image formation)
- image store: the abstract
layer for image storage. Now it supports Amazon S3, Swift, sheepdog, ceph,
GlusterFS.
Operations in Glance:
- glance image-create Create a new image
- glance image-delete Delete specified image(s).
- glance image-download Download a specific image.
- glance image-list List images you can access.
- glance image-show Describe a specific image.
- glance image-update Update a specific image.
Sunday 3 August 2014
Virtual Machine Status in OpenStack.
In OpenStack, we can see 3 types of virtual machine status:

Power status:
Power Status is the status from hypervisor. power_state is
the hypervisor state, loaded “bottom-up” from
compute worker; it can be updated in DB by tasks.
There are 3 statuses: SHUTDOWN (previous SHUTOFF) NOSTATE (previous FAILED), RUNNING(previous BLOCKED)
Status:
Status (vm_status): the stable status of the VM. It should describe a VM’s
current stable (not transition) state. vm_state should only be updated
at the end of a task, when the task successfully finishes, and setting the
task_state to None. Without API calls, the vm_state should never change.
·
INITIALIZED: VM is just created in the database, but has not
been built. (was BUILDING)
·
ACTIVE: VM is running with the specified image.
·
RESCUED: VM is running with the rescue image.
·
PAUSED: VM is paused with the specified image.
·
SUSPENDED: VM is suspended with the specified image, with a
valid memory snapshot.
·
STOPPED: VM is not running, and the image is on disk.
·
SOFT_DELETED: VM is no longer running on compute, but the disk
image remains and can be brought back.
·
HARD_DELETED: From quota and billing’s
perspective, the VM no longer exists. VM will eventually be destroyed running
on compute, disk images too.
In some situation, the Power
Status is not consistent with vm_status, if the VM is in transition status,
that is fine. Otherwise, it usually indicate the error happened.
·
RESIZED: The VM is stopped on the source node but running on the
destination node. The VM images exist at two locations (src and dest, with
different sizes). The user is expected to confirm the resize or revert it. (the
same functionality of the old task_state.RESIZE_VERIFY)
·
ERROR: some unrecoverable error happened. Only delete is allowed
to be called on the VM.
Task Status:
Task Status: task_state
should represent a transition state, and is precisely associated with one
compute API, indicating which task the VM is currently running. There are only one task (with a task
id) can be running on the VM at a time. Only HARD_DELETE can pre-empt other
tasks. The task status is driven by compute API
method and should not be changed during the task execution.
All the task status is named after verb-ing. There are around
20 task status in OpenStack.
Subscribe to:
Posts (Atom)