logo

Tuesday, 12 August 2014
Storage in Cloud
File System is a critical part in OS as it contains both OS,
application binaries as well as application data. In traditional OS, it is
usually on a hard disk or SAN attached disk. In cloud, there are more types of
storage available.
Setup All-in-One OpenStack environment by using devstack
As OpenStack is a complicated software
suit, it is not very easy to deploy OpenStack for beginners. Devstack is a very
handy tool to deploy all-in-one openstack environment
1.
the box is installed with the
ubuntu 14.4, the user is called stack
2.
update the system and packages
command: #sudo apt-get dist-upgrade
then reboot the machine
3.
make the /opt/stack world wide
readable
commands:
#sudo chown -R stack:strack /opt/stack
#sudo chmod 777 /opt/stack
4.
install git
#sudo apt-getinstall git
5.
download openstack and checkout
the Icehouse version
#sudo git clone https://github.com/openstack-dev/devstack.git
#sudo git checkout -b
icehouseorigin/stable/icehouse
6.
upload the localrc
configuration template
it should be in ~/devstack/
7.
deploy openstack
./stack.sh
After it is running for about 1 hour, you
will have a full-in-one OpenStack environment
Sunday, 10 August 2014
Create an VM in OpenStack
This is the basic workflow to create a VM in OpenStack
from http://www.slideshare.net/mirantis/openstack-cloud-request-flow

Nova-API
Nova-API
Nova-api accepts and responds to end user compute API calls.
It supports OpenStack Compute API, Amazon's EC2 API and a special Admin API
(for privileged users to perform administrative actions). It also initiates
most of the orchestration activities (such as running an instance) as well as
enforces some policy (mostly quota checks). Internally, it handles requests from the user and relays them
to the cloud controller.
Nova-API Architecture:

Nova-API Architecture:
Saturday, 9 August 2014
Keystone authentication
Keystone is the key component for OpenStack Authentication. Every requests via API must be checked and
verified by Keystone. In general , when the clients provide a valid
username/password combination, the OpenStack keystone will provide a token, the
following comminucation will be based on the token. There are two ways of
authentication for keystone due to the way how client provides their
identification: UUID and PKI.
Universally Unique IDentifier (UUID)
1. Client send the username/password to keystone
2. Keystone service verify the username/password pair
3. Keystone generate a token (usually a random string), store it in the backend and then send the copy back to the client
4. Every request from client will attach the token and keystone will verify the token(matched? Expired?)
5. If valid, keystone will return the 200 and process the request, otherwise will be an 401 then reject.
See workflow here:
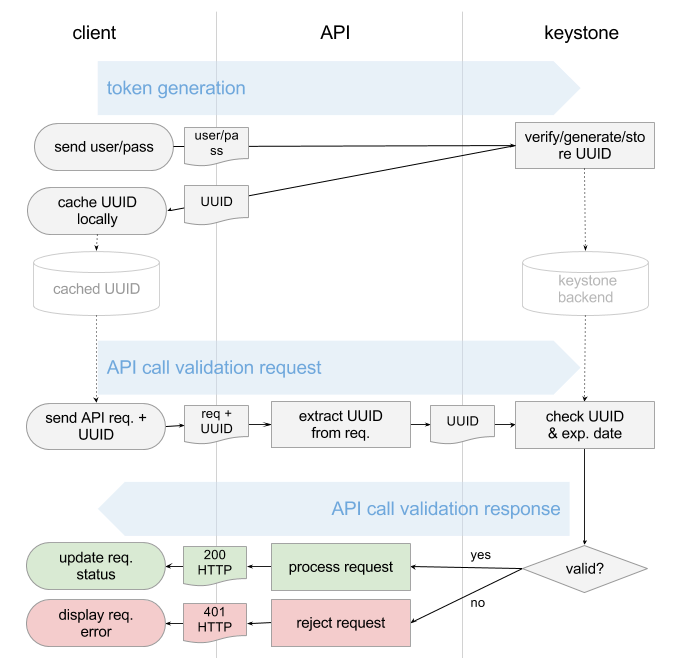
UUID is quite simple to implement but since
every requirement will be via keystone and it could be the bottleneck in the
large scale cloud.
PKI token
PKI token was introduced since Grizzly.
The workflow is similar but the token is based on X509 PKI
while Keystone is the CA.
0. When keystone was installed , we need to generate the keys and certs including CA private key, CA certificates, Signing private key, Signing certificate.
1. When client provides valid username/password pair, Keystone will use Cryptographic Message Syntax (CMS) to produce CMS token out of the following data: Service catalog,User roles,Metadata
2. The token will be cached in keystone and send back to client.
3. When the requests come via API, they will attach the CMS token , the API has got keystone’s copy of Signing certificate, Revocation list, CA certificate so it can check the validity of token offline (without contacting keystone)
4. If valid, keystone will return the 200 and process the request, otherwise will be an 401 then reject.
See workflow there

Further reading blog:
http://www.mirantis.com/blog/understanding-openstack-authentication-keystone-pki/
keystone commands
There are a few important keystone related commands every
OpenStack Operators must know.
Service related:
keystone service-list : list the keystone service
keystone service-get : get the detailed service
information
keystone service-create :
create keystone service
keystone service-delete :
delete the service
endpoint related:
keystone endpoint-list :
list the keystone endpoint
keystone endpoint-get :
get the detailed endpoint information
keystone endpoint-create :
create keystone endpoint
keystone endpoint-delete :
delete the endpoint
Tenant related:
keystone tenant-list :
list the keystone tenant
keystone tenant-get :
get the detailed tenant information
keystone tenant-create :
create keystone tenant
keystone tenant-delete :
delete the tenant
keystone tenant-update :
update the tenant information
user related:
keystone user-list :
list the keystone user
keystone user-get :
get the detailed user information
keystone user-create :
create keystone user
keystone user-delete :
delete the user
keystone user-update :
update the user information
keystone user-password-update : update the user password information
keystone user-role-update
: update the user role information
keystone user-role-add
: add the user role
information
keystone user-role-delete :
delete the user role information
keystone user-role-list :
list the user role information
Role related
keystone role-list :
list the keystone role
keystone role-get :
get the detailed role information
keystone role-create :
create keystone role
keystone role-delete :
delete the role
Friday, 8 August 2014
Install docker on ubuntu 12.04
1. Update the kernel to 3.8 above
When 12.04 was installed, the kernel was 3.3, we need to update the kernel to 3.8 above to better support dockersudo apt-get update
sudo apt-get install linux-image-generic-lts-raring linux-headers-generic-lts-raring
sudo reboot
then we can check
stack@openstack:~$ uname -a
Linux openstack 3.13.0-29-generic #53-Ubuntu SMP Wed Jun 4 21:00:20 UTC 2014 x86_64 x86_64 x86_64 GNU/Linux
2. Add docker key to your local key repository
sudo apt-key adv --keyserver keyserver.ubuntu.com --recv-keys 36A1D7869245C8950F966E92D8576A8BA88D21E9you can check as
stack@openstack:~$ sudo apt-key list
/etc/apt/trusted.gpg
--------------------
pub 1024D/437D05B5 2004-09-12
uid Ubuntu Archive Automatic Signing Key <ftpmaster@ubuntu.com>
sub 2048g/79164387 2004-09-12
pub 1024D/FBB75451 2004-12-30
uid Ubuntu CD Image Automatic Signing Key <cdimage@ubuntu.com>
uid Ubuntu CD Image Automatic Signing Key <cdimage@ubuntu.com>
pub 4096R/C0B21F32 2012-05-11
uid Ubuntu Archive Automatic Signing Key (2012) <ftpmaster@ubuntu.com>
uid Ubuntu Archive Automatic Signing Key (2012) <ftpmaster@ubuntu.com>
pub 4096R/EFE21092 2012-05-11
uid Ubuntu CD Image Automatic Signing Key (2012) <cdimage@ubuntu.com>
pub 2048R/A88D21E9 2013-08-16
uid Docker Release Tool (releasedocker) docker@dotcloud.com
check by :
uid Ubuntu CD Image Automatic Signing Key (2012) <cdimage@ubuntu.com>
pub 2048R/A88D21E9 2013-08-16
uid Docker Release Tool (releasedocker) docker@dotcloud.com
3. Add the repository to your APT sources
#sudo sh –c “echo deb https://get.docker.io/ubuntu docker main > /etc/apt/sources.list.d/docker.list”check by :
stack@openstack:~$ cat /etc/apt/sources.list.d/docker.list
deb https://get.docker.io/ubuntu docker main
check by
stack@openstack:~$ ps -ef | grep docker
root 1419 1 2 22:19 ? 00:00:55 /usr/bin/docker -d
check by
stack@openstack:~$ sudo docker ps -l
CONTAINER ID IMAGE COMMAND CREATED STATUS PORTS NAMES
a4c13d74f23a ubuntu:14.04 /bin/echo hello worl 11 minutes ago Exited (0) 11 minutes ago tender_heisenberg
hello world
deb https://get.docker.io/ubuntu docker main
4. Install docker
sudo apt-get update ; sudo apt-get install -y lxc-dockercheck by
stack@openstack:~$ ps -ef | grep docker
root 1419 1 2 22:19 ? 00:00:55 /usr/bin/docker -d
5. Install Ubuntu to your local sandbox
sudo docker pull Ubuntucheck by
stack@openstack:~$ sudo docker ps -l
CONTAINER ID IMAGE COMMAND CREATED STATUS PORTS NAMES
a4c13d74f23a ubuntu:14.04 /bin/echo hello worl 11 minutes ago Exited (0) 11 minutes ago tender_heisenberg
6. Hello world now:
stack@openstack:~$ sudo docker run ubuntu /bin/echo hello worldhello world
now a standard docker is running on your ubuntu 12.4
Subscribe to:
Posts (Atom)